Polynesia is one of the more relaxed settlements – and for a simple reason: there are no roads. No layout puzzle, no connection planning. You build compactly, produce goods, complete quests. That's it.
The settlement unlocks with the HMA research "Signage". It is the sixth cultural settlement and works well as an entry point.
What makes Polynesia special?
| Feature | Polynesia |
|---|---|
| Roads | None – buildings don't need a connection |
| Bottleneck | Shells – limits production |
| Playthroughs | 13 |
| Quests | 18 |
Buildings & Production
Residential buildings (shells + population)
| Building | Size | Population | Shell output |
|---|---|---|---|
| Small Hut | 2×2 | 28 | 121 / 5h |
| Pile Dwelling | 3×3 | 88 | 508 / 10h |
| Family Hut | 4×4 | 233 | 2,028 / 20h |
Residential buildings provide population and shells – but the shell output is low relative to the space they take up (Small Hut: ~24/h) compared to diplomacy buildings (Dance Stage 216/h). In practice: only place as many residential buildings as you actually need for population – the rest goes to production and shell suppliers. Since there are no roads, placement is overall simpler than e.g. with the Vikings.
Goods buildings
| Building | Size | Produces |
|---|---|---|
| Rahui Fisher | 3×3 | Fish |
| Palm Garden | 4×3 | Coconuts |
| Kava Farm | 3×4 | Kava |
| Catamaran Builder | 4×4 | Catamarans |
All goods buildings have identical production values – only the good differs:
| Production | 5 | 10 | 20 |
|---|---|---|---|
| Cost (shells) | 1,000 | 2,000 | 4,000 |
| Duration | 5h | 10h | 20h |
Diplomacy buildings
| Building | Size | Diplomacy | 5 min | 15 min | 1h | 5h | 10h | 20h |
|---|---|---|---|---|---|---|---|---|
| Masked Totem | 1×1 | 6 | – | – | – | – | – | – |
| Dance Stage | 2×3 | 33 | 30 | 72 | 216 | 576 | 863 | 1,726 |
| Melodic Statue | 3×1 | 33 | – | – | – | – | – | – |
| Statue of Music | 1×3 | 33 | – | – | – | – | – | – |
| Nature Totem | 2×3 | 98 | – | – | – | – | – | – |
| Communal Cooking Area | 3×4 | 130 | 79 | 188 | 563 | 1,500 | 2,249 | 4,498 |
| Hut of the Royal Storage | 3×5 | 243 | 113 | 270 | 808 | 2,155 | 3,232 | 6,464 |
From the 10h cycle onwards, shells per hour drop dramatically (Dance Stage: only ~58/h). In practice: prefer the 1h and 5h cycles, use 10h overnight.
Shells per hour comparison:
| Building | 1h cycle | Space | Shells/Area |
|---|---|---|---|
| Small Hut | 24.2/h | 2×2 | 6.05 |
| Dance Stage | 216/h | 2×3 | 36 |
| Communal Cooking Area | 563/h | 3×4 | 46.9 |
| Hut of the Royal Storage | 808/h | 3×5 | 53.9 |
Expansions
| Sector | Fish | Coconuts | Kava | Catamarans |
|---|---|---|---|---|
| 1 | 5 | 5 | 5 | 5 |
| 2 | 15 | 5 | 5 | 5 |
| 3 | 30 | 15 | 5 | 5 |
| 4 | 50 | 30 | 5 | 5 |
| 5 | 60 | 50 | 15 | 5 |
| 6 | 65 | 60 | 30 | 5 |
Tip: Always use the good with the lowest quantity for expansions – production time stays the same, you just need fewer units.
Optimal flow
Phase 1: Starting layout
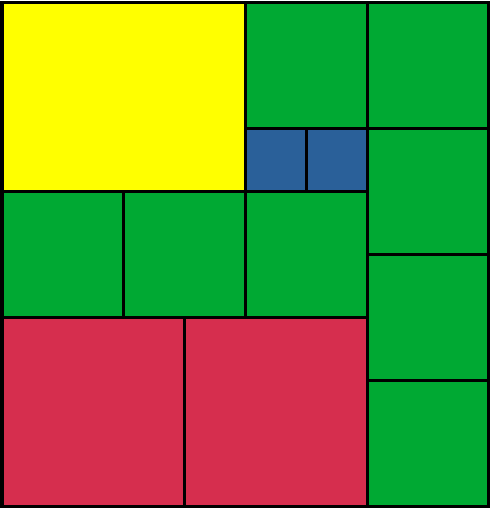
- 6 Small Huts + 2 Rahui Fishers
- 5 Masked Totems (6 diplomacy each) → 30 diplomacy for quest 4
- This clears quests 1–4 right away (2 huts, 3 totems, 1 fisher, 30 diplomacy)
- Demolish the totems → place 2 additional huts in their spot
- Final state: 2 Rahui Fishers + 8 Small Huts, build area full
- Wait one hour until the fishers are finished building → start 2× 5h production (or 10h if overnight)
Phase 2: First harvest & Dance Stage
- Collect the harvest → buy an expansion with the fish
- New space available → place totems to unlock the Dance Stage (30 diplomacy)
- Demolish the totems → build 2 Dance Stages
- The dance stages now provide shells for further production cycles
Phase 3: Unlock step by step
- Repeat the same pattern: buy expansion → briefly place diplomacy buildings → unlock building → demolish totems/statues → build a productive building
- Palm Garden (120 diplomacy) → Pile Dwelling (195) → Kava Farm (375) → Catamaran Builder (595)
- Replace huts with pile dwellings and family huts as soon as they become available
- How quickly you get through the settlement depends heavily on your 4× luck
Production logic
Only produce the goods needed for the next unlock / quest / expansion. Each new unlock gives you more efficient buildings. Getting to new goods quickly brings new expansions – more space = more production.
The bottleneck is space: each expansion provides 16 tiles (4×4). The number of simultaneously usable goods buildings grows with each expansion: 2 → 3 → 4 over the course of the settlement, unless very unfavorable obstacles throw a wrench into your plans.
TL;DR: 6 huts + 5 totems + 2 fishers → remove totems, add 8 huts → produce → expansion → dance stage → then unlock everything step by step.
Rewards
| Playthrough | Reward |
|---|---|
| 1 | Hut of Sacred Instruments, level 1 |
| 2 | Emissary Nafanua (Forge Points) |
| 3–4 | Upgrade kit for the Hut |
| 5 or 6 | Emissary Hotu Matu'a (units) |
| 6–8 | Upgrade kits |
| 9 | Emissary Taema (100 goods of previous era) |
| 10–11 | Upgrade kits |
| 12 | Emissary Hongi Hika (70 goods of own era) |
| 13 | Hut of Sacred Instruments, level 9 (max) |
Emissaries & Slots
The settlement unlocks 4 emissaries. The slots are located in your capital's Town Hall.
| Emissary | Daily Bonus |
|---|---|
| Nafanua | 12 FP |
| Hotu Matu'a | 13 units of your current age |
| Taema | 100 goods of your previous age |
| Hongi Hika | 70 goods of your current age |
Hut of Sacred Instruments (main building)
9 levels plus an "Ascended" level (orange). This lasts only 28 days, after which the building falls back to the normal max level. Unlocked by one more playthrough after reaching level 9 – that's the "∞" entry in the table above.
Level 9:
- 77% Atk/Def (universal), 38% gg/gex, 30% qi
- 5,267–411,641 shells
- Motivated: 70 FP, 525 goods of your previous age, 5,213–63,267 supplies, +17 random units
Great Dance Stage (time challenge)
The dance stage is a 2×2 building with 5 levels. Fragments are awarded only if you finish the settlement within a time window:
| Rank | Deadline | Fragments |
|---|---|---|
| Gold | ≤ 16 days | 9 |
| Silver | ≤ 19 days | 4 |
| Bronze | ≤ 22 days | 2 |
The dance stage isn't really worth it. If you focus on the hut + emissaries, you can ignore the deadlines – main building and emissaries are awarded regardless of duration.
Tips for a smooth run
- No roads to plan. Unlike the Vikings, buildings here don't need a connection – you build compactly without any connection planning.
- Only keep diplomacy buildings as long as needed. Totems and statues are pure wasted space once the target building is unlocked. Exception: a 1×1 totem in an otherwise unused gap.
- Complete quests via the easier route. The "OR" quests (e.g. 30 diplomacy OR 5 fish): if you're currently producing, take the goods path. If you're rebuilding anyway, briefly place totems – that's faster than waiting for a full production cycle.
- Use the 4× bonus. Starts at a 5% chance and rises per playthrough up to 25%. A quadruple bonus can let you skip an entire phase – if it comes, buy the next expansion immediately.
- Match production cycles to your login rhythm. Online 2× a day: use 10h. Checking in often: use 5h. Never set longer than you can collect.