The Viking Settlement is the first cultural settlement in Forge of Empires. Its defining trait is paradoxically its absence: there's no trader, no mini-game, no special mechanic to speed up a run. That makes it easy to understand – you play through it with the basic mechanics: space constraints, coin scarcity, roads and obstacles. The settlement unlocks with the Iron Age technology "Plowing". You start on a 2×2 grid around the embassy with 6,400 copper coins as starting capital.
Overview
| Feature | Value |
|---|---|
| Playthroughs | 15 (main building max) + Ascended from 16 |
| Goods | Axes, Mead, Horns, Wool |
| Bottleneck | Copper coins – limits production |
| Roads | Yes – cost 200 coins per tile |
Roads are a critical planning factor: due to their cost, demolition should be avoided during rebuilds (loss of 200 coins per road). Residential buildings still provide population without a road connection, just no coins in that case. Goods and diplomacy buildings require a road connection to the embassy to produce – merely touching the embassy without a road is not enough.
Buildings & Production
Residential buildings (copper coins + population)
| Building | Size | Production | Population | Population/Area |
|---|---|---|---|---|
| Shack | 2×2 | 108 / 5h | 16 | 4 |
| Hut | 3×3 | 449 / 10h | 59 | 6.6 |
| Clan House | 3×5 | 1,666 / 20h | 172 | 11.5 |
Residential buildings provide population and coins – but the coin output is low relative to the space they take up (Shack: ~22/h) compared to diplomacy buildings (Shrine 113/h). That's why it often makes sense to place residential buildings without a road connection on the edge, since their coin production is negligible. If a residential building happens to have a road connection, that's fine – but it's not worth making trade-offs elsewhere for it. Once you've unlocked the Shrine, only place as many residential buildings as you actually need for population.
Goods buildings
| Building | Size | Produces |
|---|---|---|
| Axe Smith | 3×3 | Axes |
| Mead Brewery | 3×4 | Mead |
| Beast Hunter | 3×3 | Horns |
| Wool Farm | 5×3 | Wool |
All goods buildings have identical production values – only the good differs:
| Production | 5 | 10 | 20 |
|---|---|---|---|
| Cost (coins) | 1,000 | 2,000 | 4,000 |
| Duration | 5h | 10h | 20h |
Diplomacy buildings (coins + diplomacy)
| Building | Size | Diplomacy | 5 min | 15 min | 1h | 5h | 10h | 20h |
|---|---|---|---|---|---|---|---|---|
| Runestone | 1×1 | 6 | – | – | – | – | – | – |
| Shrine | 2×2 | 24 | 16 | 38 | 113 | 300 | 449 | 898 |
| Clan Totem | 1×2 | 24 | – | – | – | – | – | – |
| Market | 3×3 | 108 | 41 | 98 | 294 | 784 | 1,175 | 2,350 |
| Old Pasture | 3×2 | 108 | – | – | – | – | – | – |
| Mead Hall | 5×3 | 270 | 91 | 217 | 649 | 1,729 | 2,593 | 5,186 |
From the 10h cycle onwards, coins per hour drop dramatically (Shrine: only ~45/h). In practice: prefer the 1h and 5h cycles, use 10h overnight.
Coins per hour comparison:
| Building | 1h cycle | Space | Coins/Area |
|---|---|---|---|
| Shack | 21.6/h | 2×2 | 5.4 |
| Shrine | 113/h | 2×2 | 28.25 |
| Market | 294/h | 3×3 | 32.7 |
| Mead Hall | 649/h | 5×3 | 43.3 |
Expansions
| Sector | Axes | Mead | Horns | Wool |
|---|---|---|---|---|
| 1 | 1 | 1 | 1 | 1 |
| 2 | 5 | 1 | 1 | 1 |
| 3 | 12 | 1 | 1 | 1 |
| 4 | 21 | 5 | 1 | 1 |
| 5 | 32 | 12 | 1 | 1 |
| 6 | 41 | 21 | 5 | 1 |
| 7 | 48 | 32 | 12 | 1 |
| 8 | 55 | 41 | 21 | 5 |
| 9 | 62 | 48 | 32 | 12 |
| 10 | 69 | 55 | 41 | 21 |
Tip: Always use the good with the lowest quantity in the table for expansions (e.g. 1 mead instead of 12 axes) – production time per good is the same, you just need fewer units. In practice 8 expansions are enough.
Optimal flow
Phase 1: Starting layout
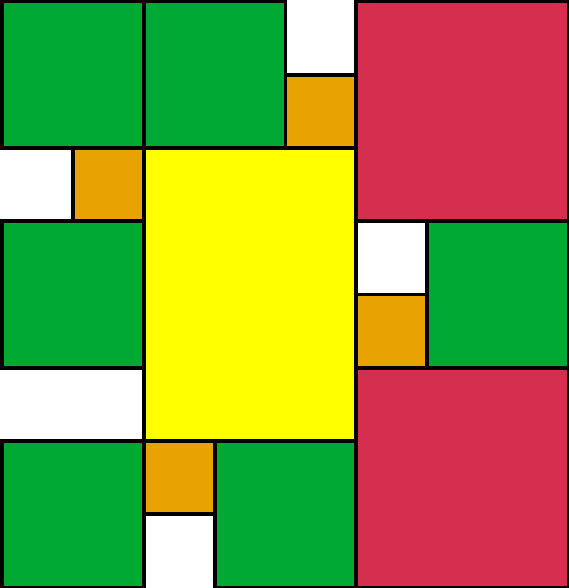
- 6 Shacks + 2 Axe Smiths on the 8×8 grid
- 4 roads (200 coins each) connect the embassy to the axe smiths and all residential buildings
- Start costs: 4 × 200 (roads) = 800, production cost 2 × 1,000 (5h axe smith production) = 2,000
- Remaining after start: 3,600 coins + ongoing shack production
Phase 2: First production & decision
- Start 2×5h in both axe smiths → harvest (coins + axes)
- The remaining coins + shack re-production are enough for a second round of 2×5h
Decision tree after first harvest:
| Result | Action |
|---|---|
| 4X bonus hit (≥20 axes) | Keep both axe smiths, buy expansions, unlock and place shrines |
| No 4X + still have time | Run another 2×5h → harvest → then buy 2 expansions, unlock shrines, rebuild and place shrines, run 1 axe smith on 10h for the night |
| No 4X + no time left | Sell 1 axe smith, unlock shrines, continue with only 1 axe smith + 2 shrines |
Phase 3: Early phase
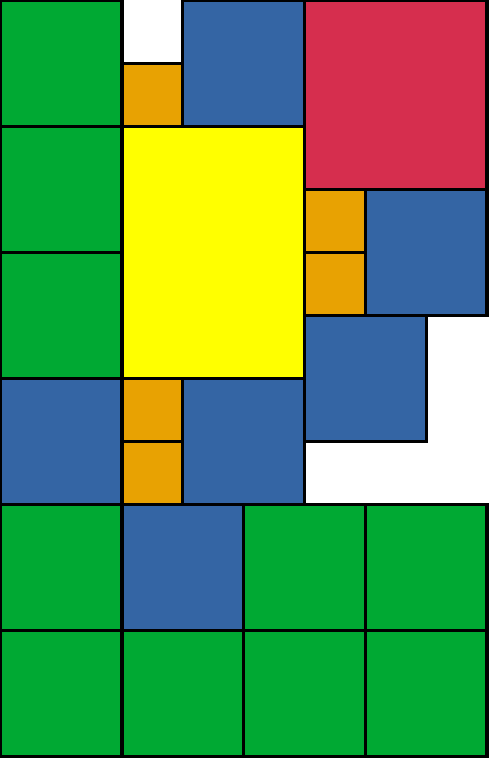
- Unlock the mead brewery
- Buy 2 expansions with mead
- Replace shacks with huts as soon as they become available
- Choose expansions with better-placed obstacles if possible
Phase 4: Mid phase (day 2–4)
- Unlock the Beast Hunter → now 3 goods buildings at once
- Buy 2 expansions with horns
Phase 5: Late phase (day 4+)
- Replace shrines with markets
- Replace huts with clan houses
- Wool Farm + final expansion(s) → 5th goods building
- The rest runs relatively relaxed – balance production, complete quests
Production logic
Only produce the goods needed for the next unlock / quest / expansion. Each new unlock gives you more efficient buildings. Getting to new goods quickly brings new expansions – more space = more production.
The number of simultaneously usable goods buildings depends on coin production (coins are the bottleneck). Normal progression: 2 → 3 → 4 → 5 goods buildings over the course of the settlement.
| Timing | Goods buildings | Trigger |
|---|---|---|
| Start | 2 | – |
| First mead expansion | 3 | Mead brewery built |
| Markets unlocked | 4 | Beast Hunter + space freed by markets |
| Wool + final expansion | 5 | Wool Farm built |
TL;DR: 2 expansions with axes → 2 with mead → 2–4 with horns → 1 with wool. Target is 5 goods buildings at the end. Logging in three times a day (morning / noon / evening) is enough for an active run.
Rewards
| Playthrough | Reward |
|---|---|
| 1 | Yggdrasil – Level 1 |
| 2 | Emissary Harald Hardrada + Slot |
| 3 | Yggdrasil Upgrade Kit |
| 4 | Emissary Erik the Red |
| 5 | Yggdrasil Upgrade Kit |
| 6 | Yggdrasil Upgrade Kit |
| 7 | Emissary Leif Erikson + Slot |
| 8 | Yggdrasil Upgrade Kit |
| 9 | Yggdrasil Upgrade Kit |
| 10 | Yggdrasil Upgrade Kit |
| 11 | Emissary Freydís Eiríksdóttir |
| 12 | Yggdrasil Upgrade Kit |
| 13 | Emissary Gudrid Thorbjarnardóttir + Slot |
| 14 | Emissary Aud the Deep-Minded |
| 15 | Yggdrasil Upgrade Kit (Level 9, max) |
| ∞ | Ascended Yggdrasil Upgrade Kit |
Emissaries & Slots
The settlement unlocks 6 emissaries and 3 emissary slots. The slots are located in your capital's Town Hall.
| Emissary | Daily Bonus |
|---|---|
| Harald Hardrada | 16 FP |
| Erik the Red | 70 goods of your current age |
| Leif Erikson | 100 goods of your previous age |
| Freydís Eiríksdóttir | 80 goods of your current age |
| Gudrid Thorbjarnardóttir | 13 units of your current age |
| Aud the Deep-Minded | 100 goods of your previous age |
Greater Runestone (secondary building)
5 levels, fragments only if you finish within the time limits:
| Rank | Deadline |
|---|---|
| Gold | ≤ 16 days |
| Silver | ≤ 19 days |
| Bronze | ≤ 22 days |
Bonus per level: +2% attack, coins, medals, goods, FP. Barely relevant nowadays – the bonus is small and doesn't force you into a time window.
Yggdrasil (main building)
9 levels plus an "Ascended" level (orange). This lasts only 28 days, after which the building falls back to the normal max level. Unlocked by one more playthrough after reaching level 9 – that's the "∞" entry in the table above.
Tips for a smooth run
- Coins are the bottleneck. The shorter the production cycle, the more coins per hour – a 1h production is ideal but you need to have the time for it. From 10h onwards it drops sharply.
- Maximize the x4 chance: If possible, run two 5h cycles instead of one 10h production. The x4 chance is independent per cycle – more cycles = higher hit rate.
- Only produce as much as needed – but look ahead. If the next building only needs a few goods, produce them along with your current batch. It's a waste of time to build and demolish a goods building just for that.
- Place residential buildings on the edge. They don't need a road connection and still provide population. This keeps space free for production. The relative coin output of residential buildings (~22/h) vs. shrine (113/h) or market (294/h) is too low.
- Diplomacy only as much as needed and short-term. Runestones and clan totems are pure wasted space after all buildings are unlocked – replace them with more productive buildings. Shrines, on the other hand, are your main coin source in the early phase.
- Choose expansions based on obstacle layout. Rocks and trees block tiles – the arrangement is regenerated on every restart. Pick sectors whose layout fits your plan.
- Don't hold idle population. It's better to demolish a building than let unused population sit around.
- Yggdrasil and emissaries you get regardless of duration – the time limits only affect the Runestone fragments.